hlink安装及重启脚本(威联通篇)
大家应该对hlink比较熟悉了。
它能近乎完美地按规则为我们创建一个“影子”媒体库。
对这个“影子”媒体库进行刮削、重命名、改变文件夹结构,都不会影响源文件夹的PT做种。
完善的黑白名单功能,可以满足我们对各类文件的硬链需求。
不管是硬链原盘、重编码视频,亦或是音频书籍。hlink都能完美胜任。
甚至还能处理PT客户端校验失败的情况。
用过的人都说好
那么今天就来最后一篇教程,也是相对最复杂的一篇。
威联通下,使用hlink。
话不多说,马上开始。
hlink安装需要nodejs环境,第一步我们给威联通安装nodejs。
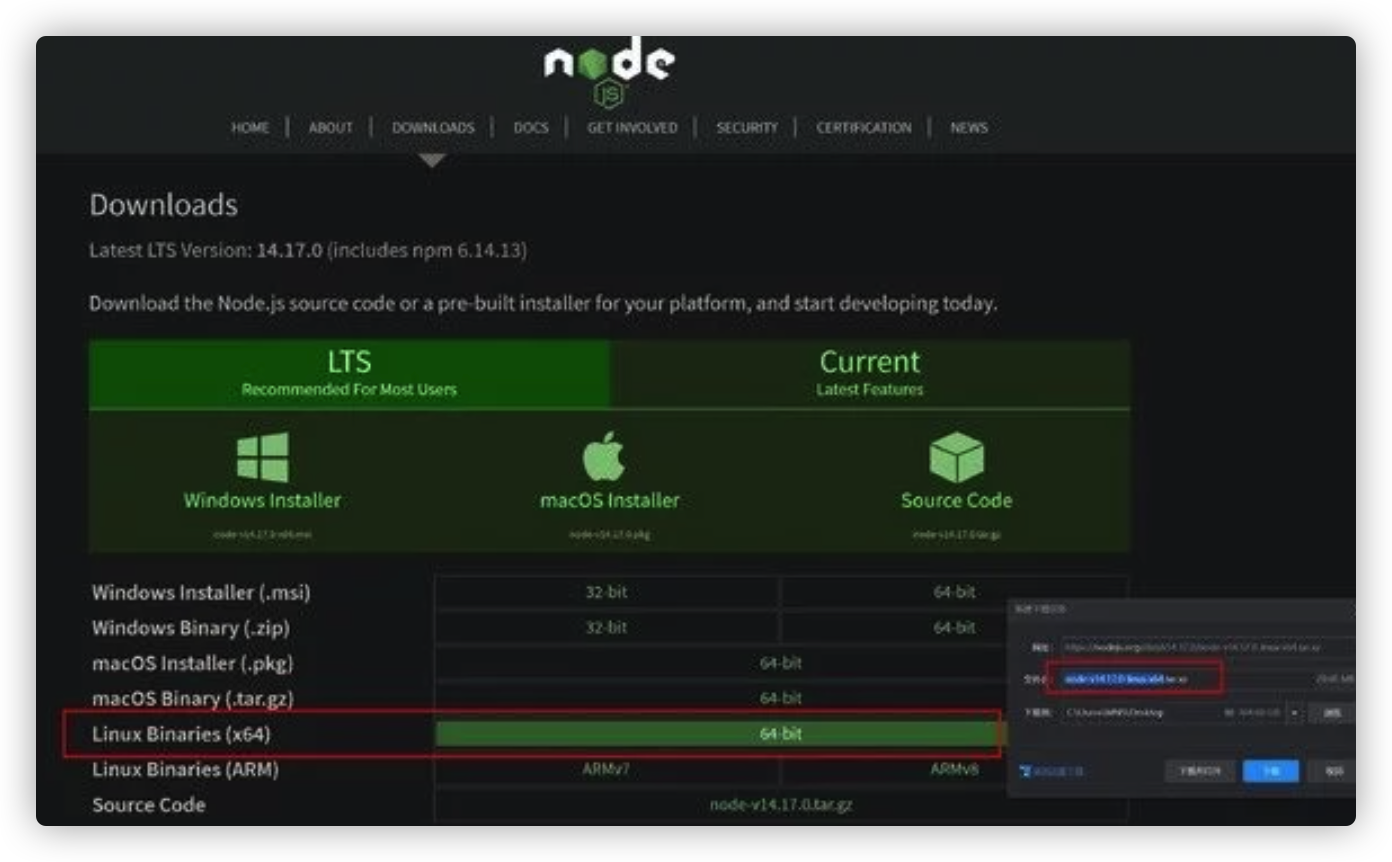
来到nodejs官网下载界面
我们这里选择linux X64版本(其他系统类似,选择合适自己的版本)
下载文件为node-v14.17.0-linux-x64.tar.xz
下载完成后把安装文件放入威联通里,我这里直接拖入威联通共享盘。
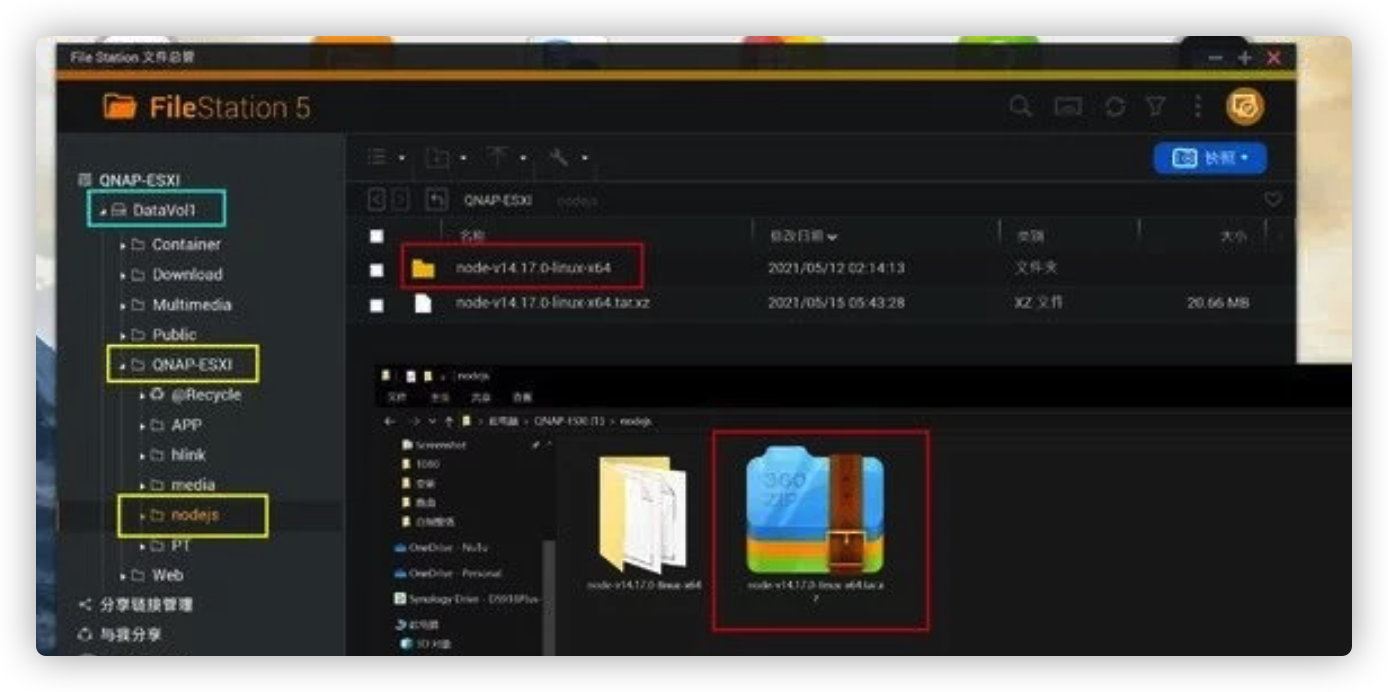
我这里威联通内文件实际路径是 /share/CACHEDEV1_DATA/QNAP-ESXI/nodejs/node-v14.17.0-linux-x64.tar.xz (威联通数据盘的的绝对路径是/share/CACHEDEV*_DATA/*******)
大家根据自己实际的路径来,不要死记照抄。
下面我们打开威联通SSH控制台,解压安装nodejs。
进入刚刚保存安装包的目录,命令如下(根据你的实际安装包存放路径填写)。
cd /share/CACHEDEV1_DATA/QNAP-ESXI/nodejs/
解压安装nodejs,命令如下(根据你的实际安装包名称填写)
tar -xvf node-v14.17.0-linux-x64.tar.xz
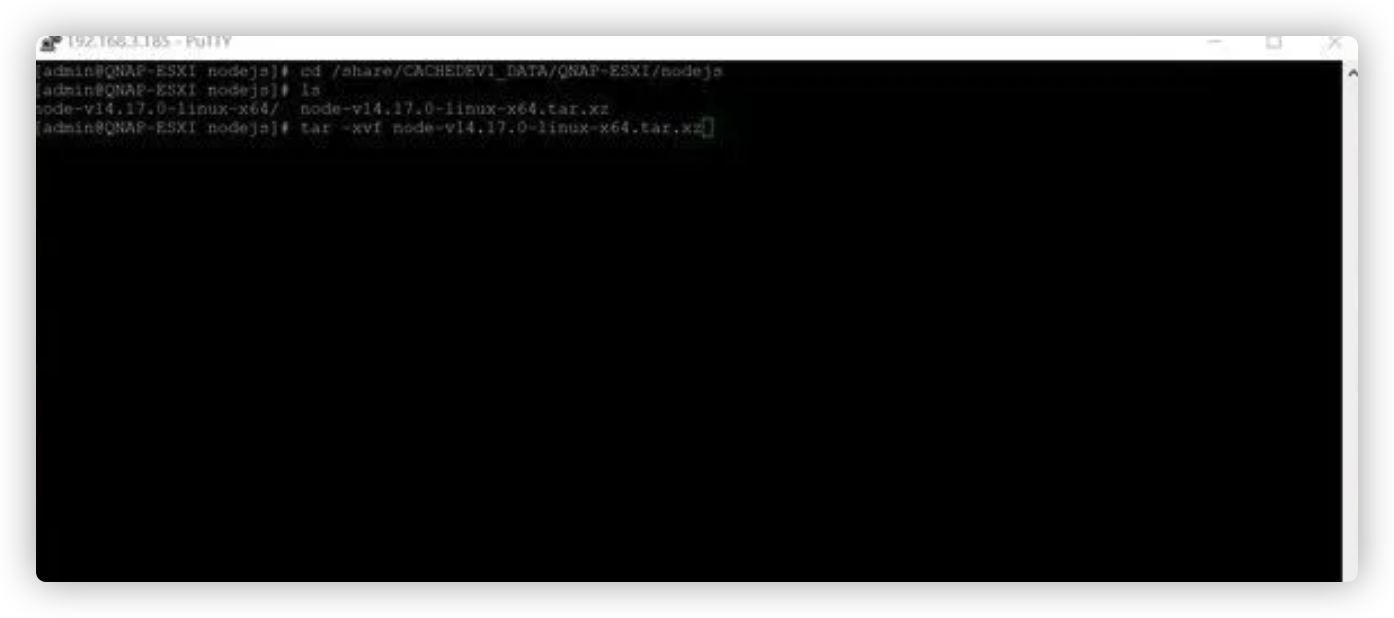
等待解压安装完成。完成后可以输入ls命令查看解压安装是否成功。有安装包同名文件夹存在就OK。
最后我们要把nodejs变为全局可用,输入并执行下面两条软连接命令即可。
ln -s /share/CACHEDEV1_DATA/QNAP-ESXI/nodejs/node-v14.17.0-linux-x64/bin/npm /usr/local/bin/
ln -s /share/CACHEDEV1_DATA/QNAP-ESXI/nodejs/node-v14.17.0-linux-x64/bin/node /usr/local/bin/
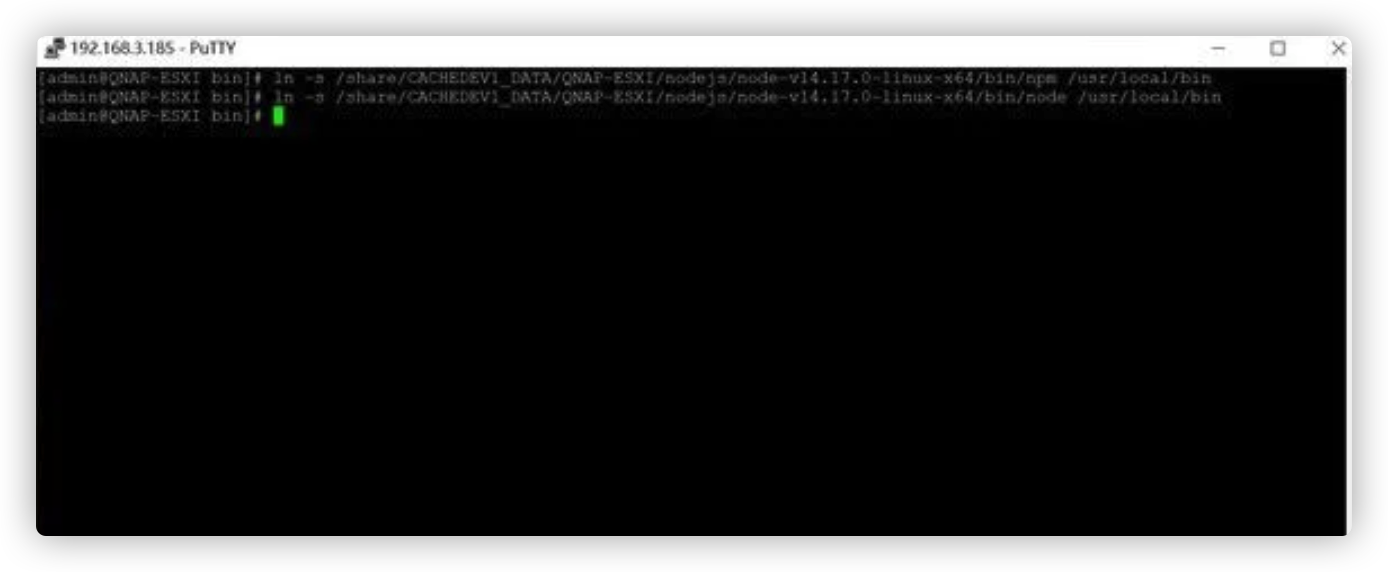
(注意路径部分是我们自定义安装nodejs的实际路径,根据个人情况自己填写,可以在威联通FileStation界面查看。)
完成nodejs环境的安装以后,我们就可以安装hlink程序了。
输入安装命令安装hlink,并等待安装完成。
npm install -g hlink
安装完成以后我们再配置一下hlink为全局可用(参考前面的配置nodejs全局可用)。
执行软链接命令
ln -s /share/CACHEDEV1_DATA/QNAP-ESXI/nodejs/node-v14.17.0-linux-x64/bin/hlink /usr/local/bin/hlink
这样就完成hlink安装,并且配置好了环境变量。可以正常使用hlink了。
hlink硬链接命令为
hlink “源路径” “目标路径”
路径部分使用绝对路径,并且建议用半角””标注,可以避免路径内文件夹名称有空格导致命令识别错误。
示例:
hlink “/share/CACHEDEV1_DATA/QNAP-ESXI/media/PT” “/share/CACHEDEV1_DATA/QNAP-ESXI/media/NFS”
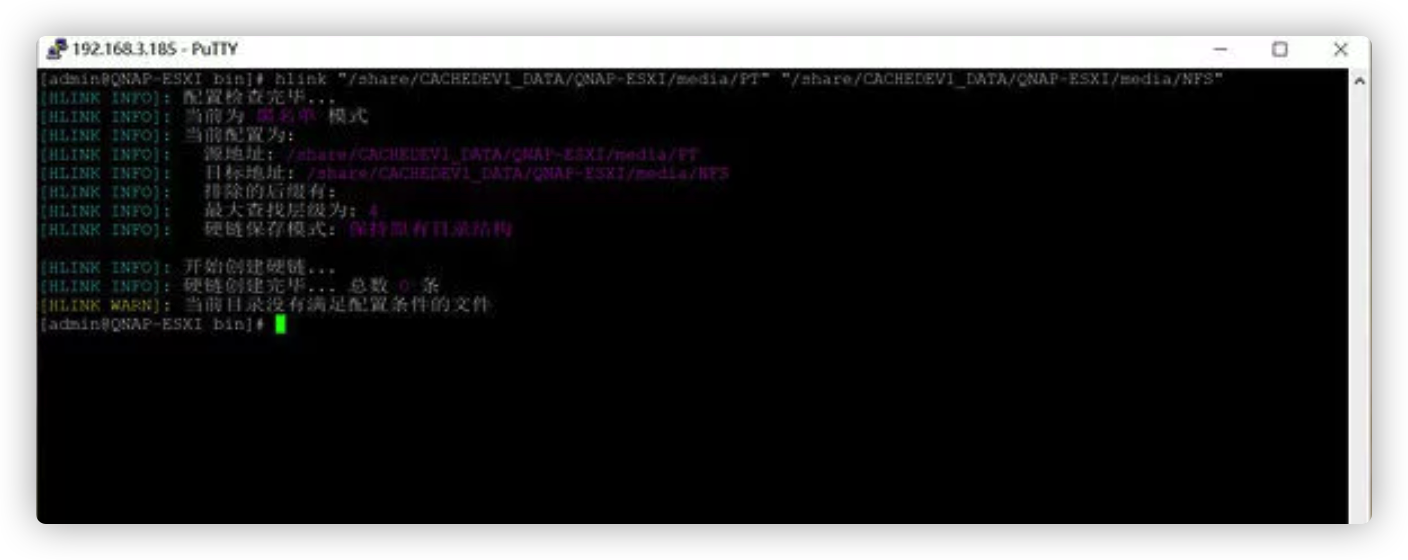
完美运行
以上就是威联通下hlink安装和基本使用方法。
进阶功能
软件功能可以在SSH输入命令
hlink –help
查看
一般我们只需要用到白名单或者黑名单功能就好了。
要使用黑名单模式,必须把hlink默认使用的白名单配置参数去除。首先我们生成配置文件。
执行
hlink -g
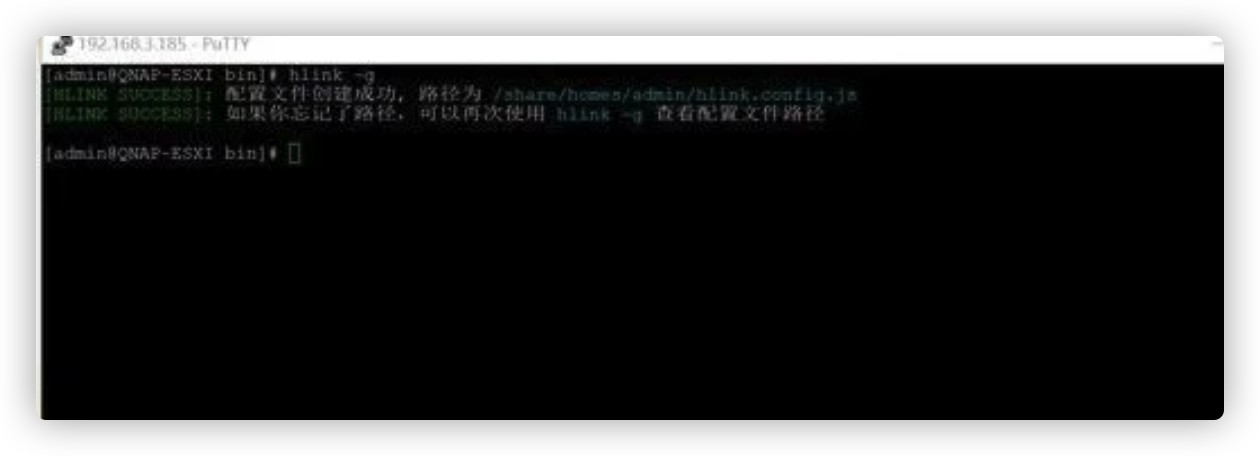
就可以生成hlink配置文件hlink.config.js
我这里生成路径为/share/homes/admin/hlink.config.js
然后编辑hlink.config.js配置文件
执行命令
vi /share/homes/admin/hlink.config.js
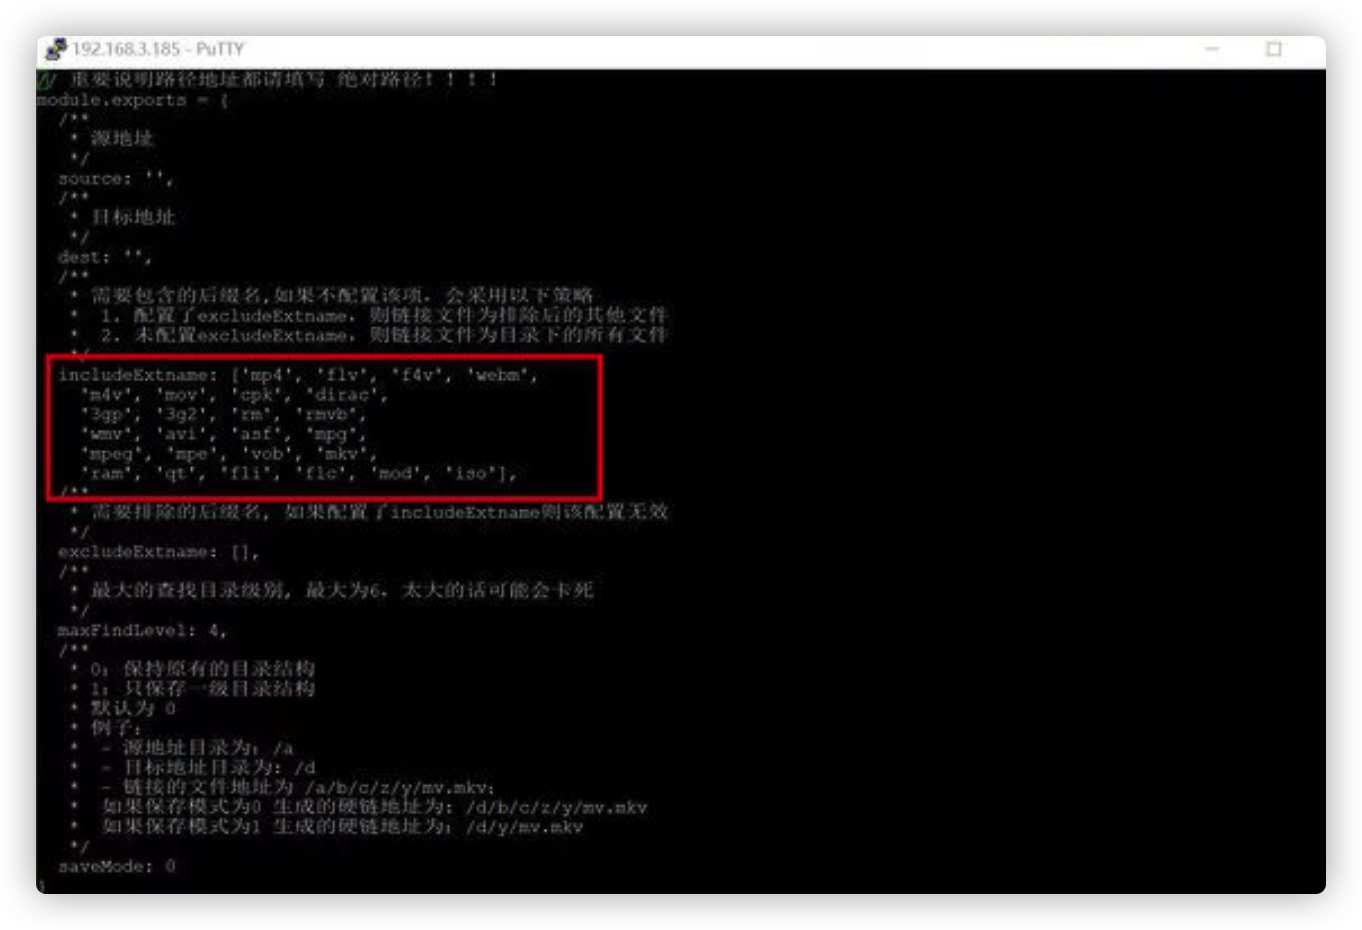
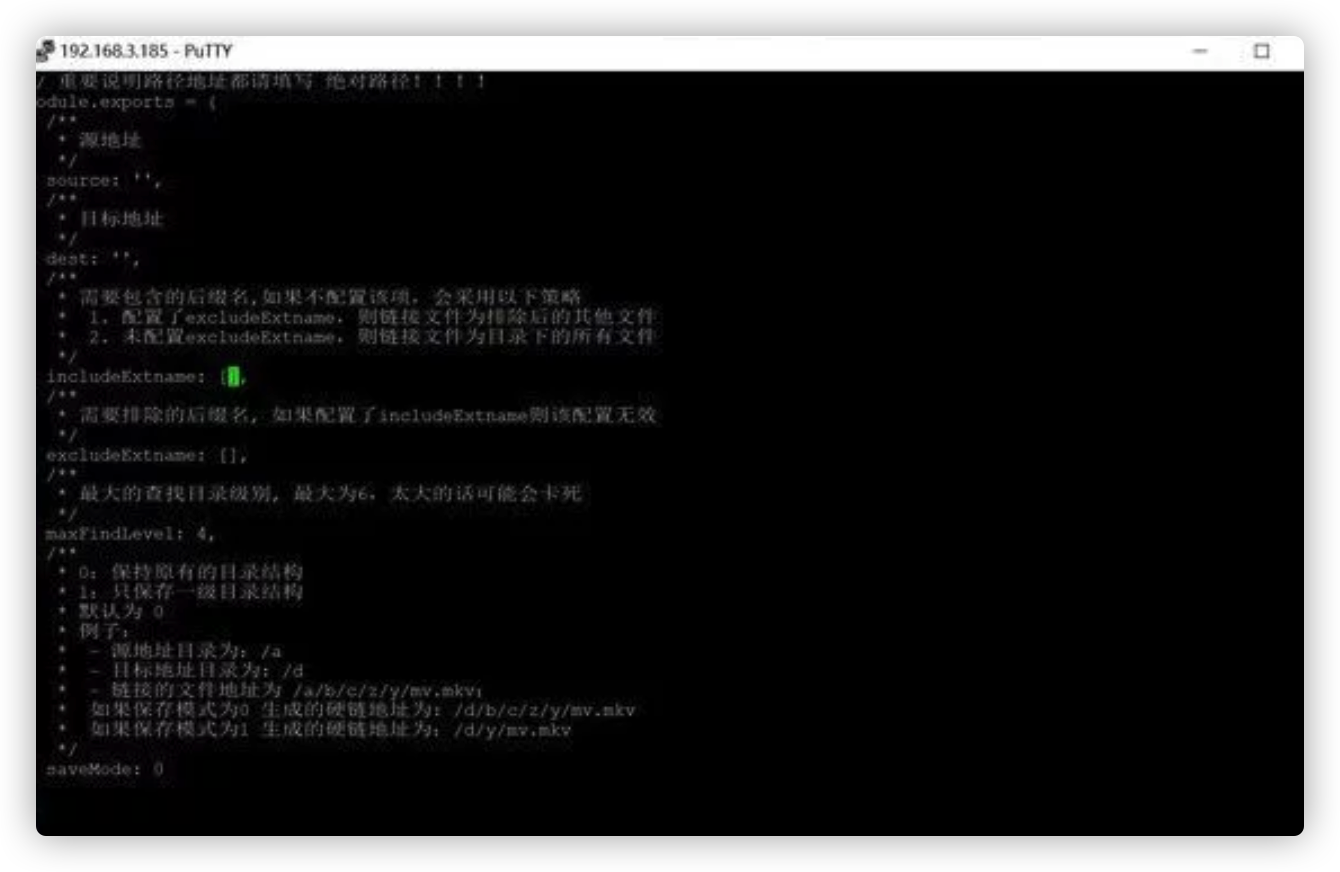
可以看到默认配置文件内容如上图。
图上includeExtname部分为hlink默认硬链的格式。
这里要把includeExtname项默认的内容都删掉,否则excludeExtname黑名单模式不生效。
删掉includeExtname内容就可以实现全内容硬链(hlink命令 “源路径” “目标路径”)、白名单硬链(hlink命令 -i=xxx “源路径” “目标路径”)、黑名单硬链(hlink命令 -e=xxx “源路径” “目标路径”)三种模式手动控制。
(按 i 键,进入编辑模式)
修改完成保存配置文件即刻生效。
(按 esc 退出编辑模式,键入 :wq 保存编辑)
这里我们要多加一步操作,把hlink.config.js配置文件复制到一个自定义路径,原因跟之前的unraid一样。威联通重启以后也会重置环境变量,hlink配置文件的默认生成目录也会被重置清空。
执行复制命令
cp /share/homes/admin/hlink.config.js /share/CACHEDEV1_DATA/QNAP-ESXI/hlink/hlink.config.js
这里我把修改好的默认配置文件,复制到了/share/CACHEDEV1_DATA/QNAP-ESXI/hlink/hlink.config.js
大家请根据自己实际情况来写。
这样我们就配置好hlink配置文件了,后面正式开始使用hlink。
黑白名单使用方法如下
白名单功能命令为-i,可以指定仅需要硬链接的格式。比如我只需要硬链接.MKV格式的文件。则命令如下(以使用部分的命令为例),注意空格。
hlink -i=mkv “/share/CACHEDEV1_DATA/QNAP-ESXI/media/PT” “/share/CACHEDEV1_DATA/QNAP-ESXI/media/NFS”
如果需要多个格式类型,则在-i=后写入,以半角逗号隔开,比如需要连接.MKV、.MP4、.MOV格式,则命令如下(以使用部分的命令为例),注意空格。
hlink -i=mkv,mp4,mov “/share/CACHEDEV1_DATA/QNAP-ESXI/media/PT” “/share/CACHEDEV1_DATA/QNAP-ESXI/media/NFS”
运行参考图

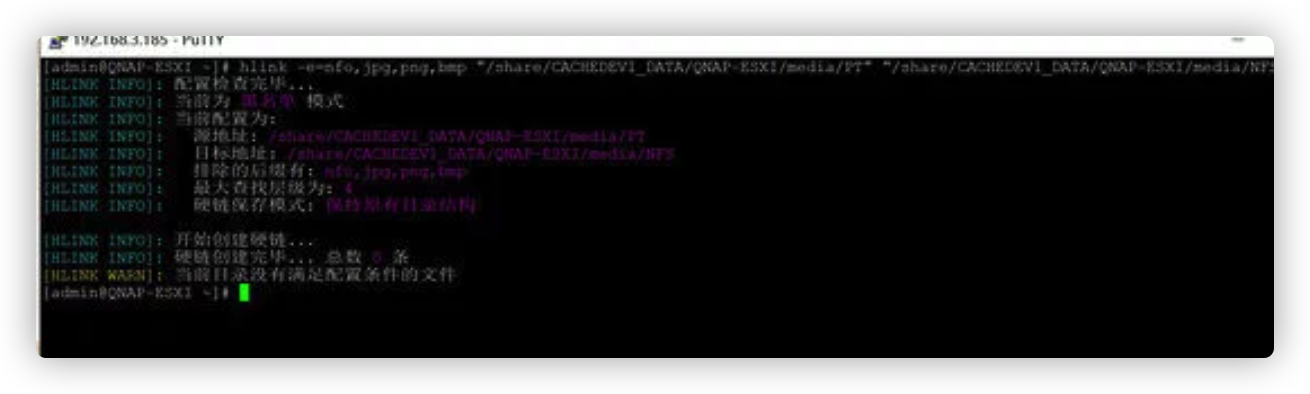
黑名单功能命令为-e,可以指定不需要硬链接的格式。比如我们不需要硬链接.nfo格式的文件。则命令如下(以使用部分的命令为例),注意空格。
hlink -e=nfo “/share/CACHEDEV1_DATA/QNAP-ESXI/media/PT” “/share/CACHEDEV1_DATA/QNAP-ESXI/media/NFS”
如果需要多个格式类型,则在-e=后写入,以半角逗号隔开,比如不需要连接.nfo、.jpg、.png、.bmp格式(这几个格式文件,进行刮削很可能会被改动,所以一定要排除。因为硬链接修改目标文件也会导致源文件同步修改,会影响做种。),则命令如下,注意空格。
hlink -e=nfo,jpg,png,bmp “/share/CACHEDEV1_DATA/QNAP-ESXI/media/PT” “/share/CACHEDEV1_DATA/QNAP-ESXI/media/NFS”
运行参考图
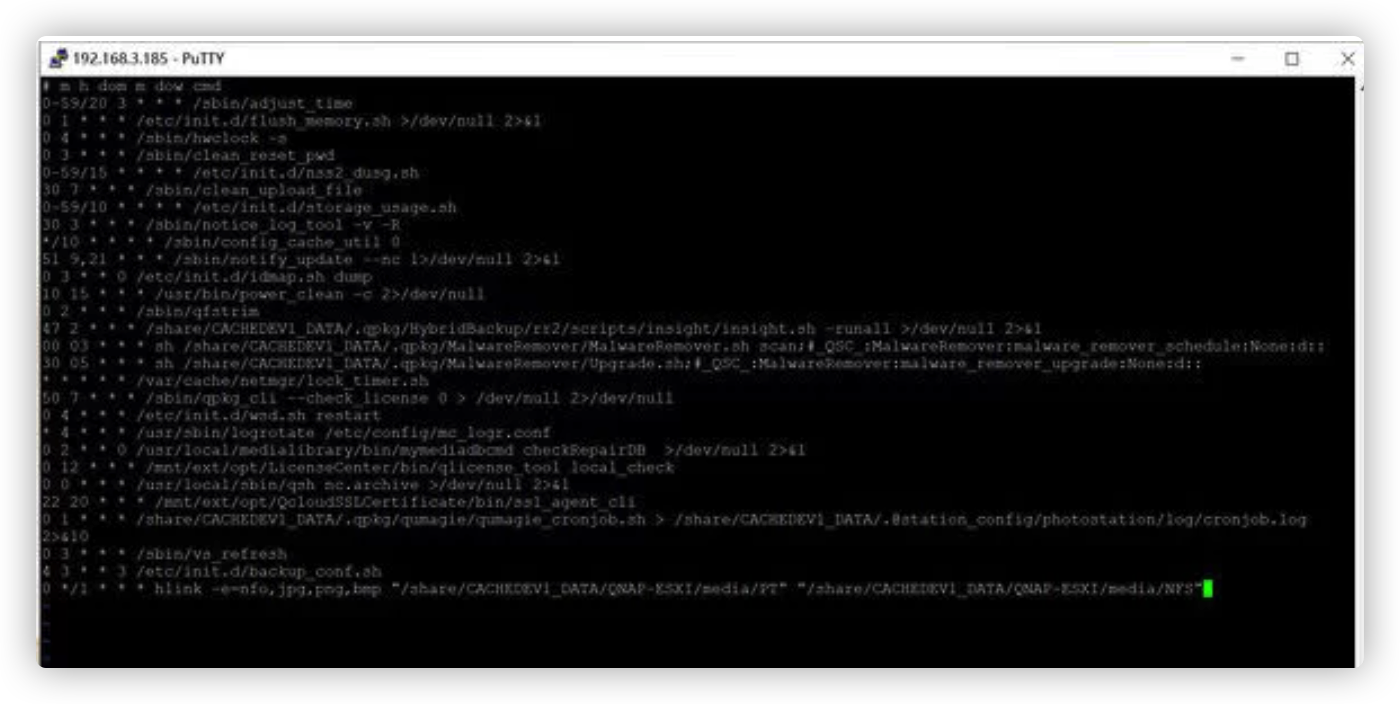
想全自动执行的话,需要在威联通的crontab里添加你需要的硬链接命令,设定自己需要的时间间隔,定时自动执行就可以了。我们要用admin账户编辑crontab配置,执行命令
vim /etc/config/crontab
按i进入编辑模式
在最后加上我们需要的hlink命令,间隔按照crontab规则写。
比如每小时执行一次,则添加的命令如下。
0 */1 * * * hlink -e=nfo,jpg,png,bmp “/share/CACHEDEV1_DATA/QNAP-ESXI/media/PT” “/share/CACHEDEV1_DATA/QNAP-ESXI/media/NFS”
示例
(按 esc 退出编辑模式,键入 :wq 保存编辑)
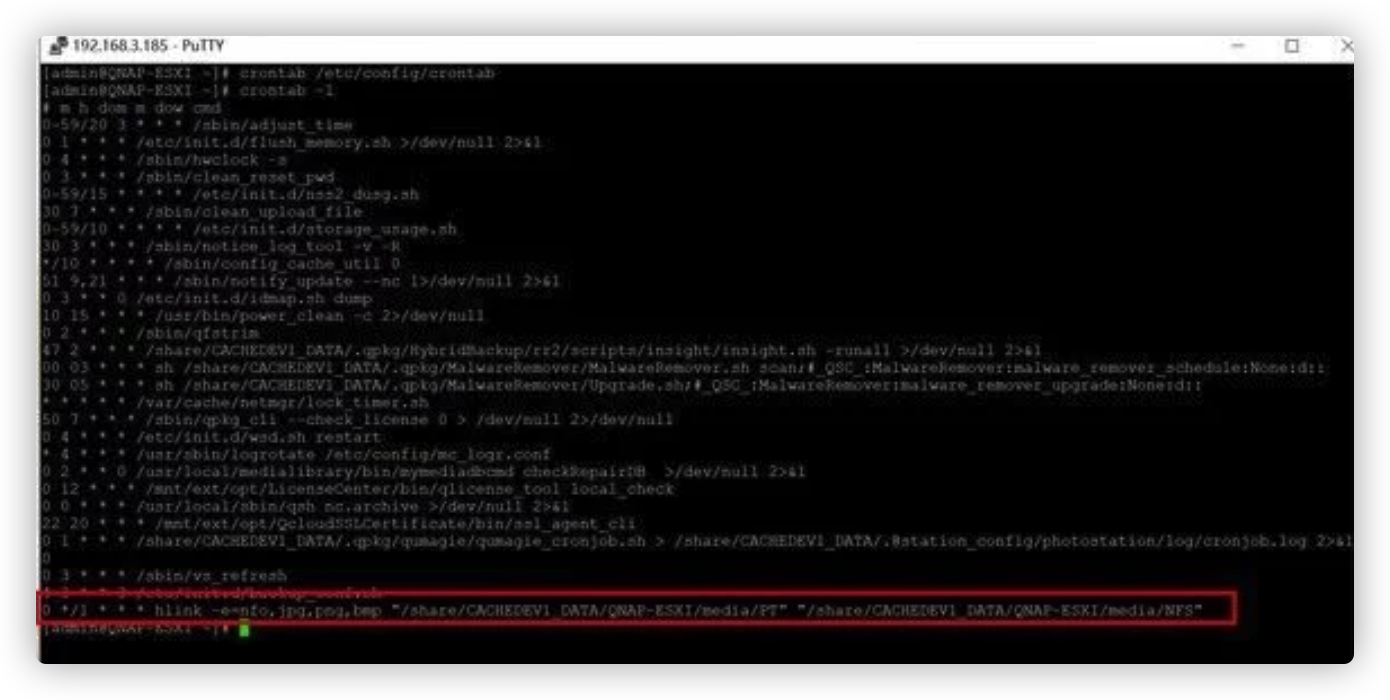
执行
crontab /etc/config/crontab
应用计划任务
执行
crontab -l
检查一下计划任务是否已生效
确认生效以后,hlink就可以后台全自动硬链接,无需人工干预。
你只需要让你的媒体库(emby、jellyfin、plex、video station)自动读取刮削目标文件夹内容就可以啦。
不论怎样刮削改名改变文件夹层级,都完全不会影响PT做种。
特别注意!
因为威联通系统的特性。
重启以后系统环境变量会重置。
hlink生成配置文件的默认目录也会被重置清空。
所以我们要把前面配置过的软连接命令设置成开机自动执行脚本。
还要把前面复制到自定义路径的配置文件链接到默认生成目录。
这样每次重启才能正常使用hlink命令。
SSH下执行
mount $(/sbin/hal_app –get_boot_pd port_id=0)6 /tmp/config
执行
vim /tmp/config/autorun.sh
按i进入编辑模式
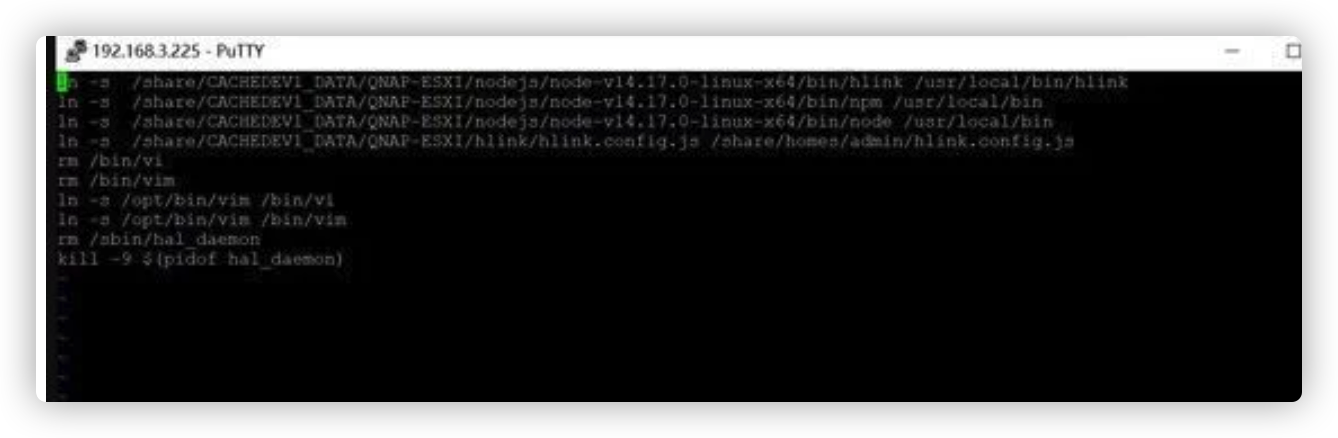
在autorun.sh中加入四条命令
ln -s /share/CACHEDEV1_DATA/QNAP-ESXI/nodejs/node-v14.17.0-linux-x64/bin/hlink /usr/local/bin/hlink
ln -s /share/CACHEDEV1_DATA/QNAP-ESXI/nodejs/node-v14.17.0-linux-x64/bin/npm /usr/local/bin
ln -s /share/CACHEDEV1_DATA/QNAP-ESXI/nodejs/node-v14.17.0-linux-x64/bin/node /usr/local/bin
ln -s /share/CACHEDEV1_DATA/QNAP-ESXI/hlink/hlink.config.js /share/homes/admin/hlink.config.js
前三条是配置环境变量的命令
第四条命令是把我们前面拷贝出来的,已经修改好的hlink配置文件,“复制”回生效路径。
修改完成保存。
(按 esc 退出编辑模式,键入 :wq 保存编辑)
给autorun.sh添加执行权限
chmod +x /tmp/config/autorun.sh
最后我们来到威联通控制台-硬件-启动时运行用户定义的进程
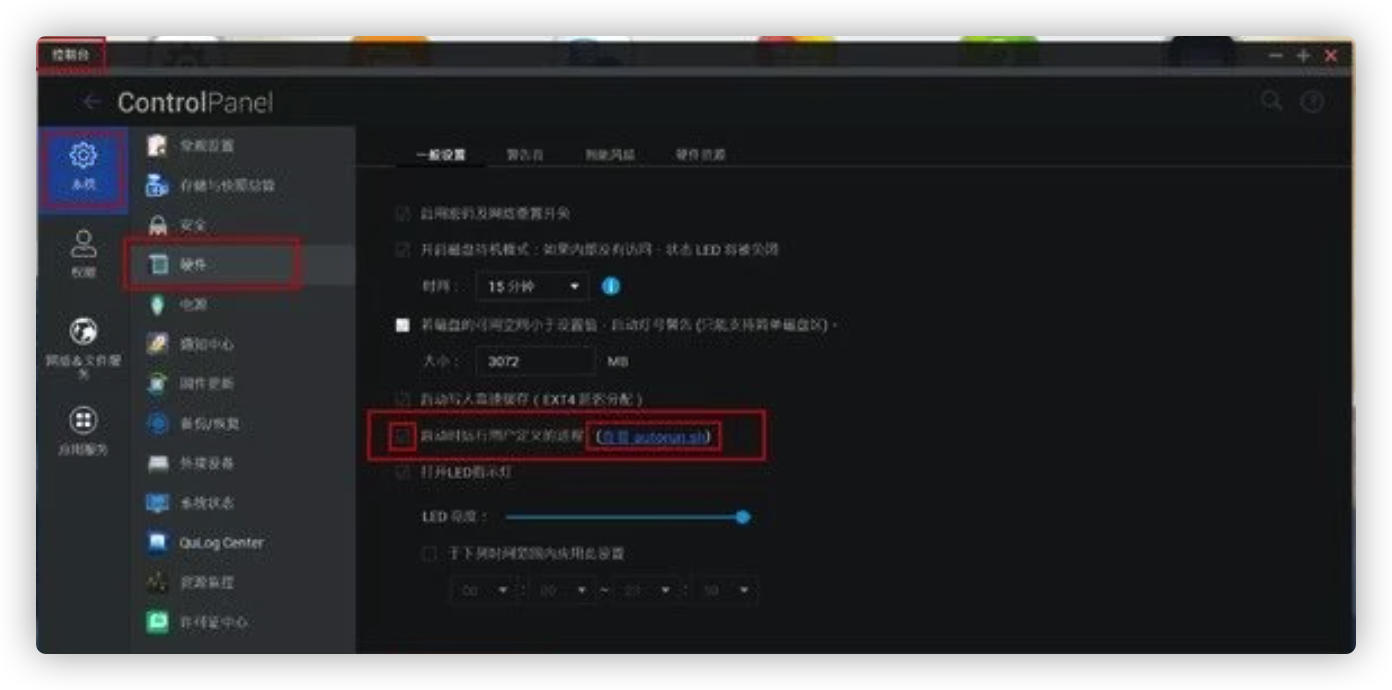
可以点击autorun.sh看看我们配置的脚本是否成功。
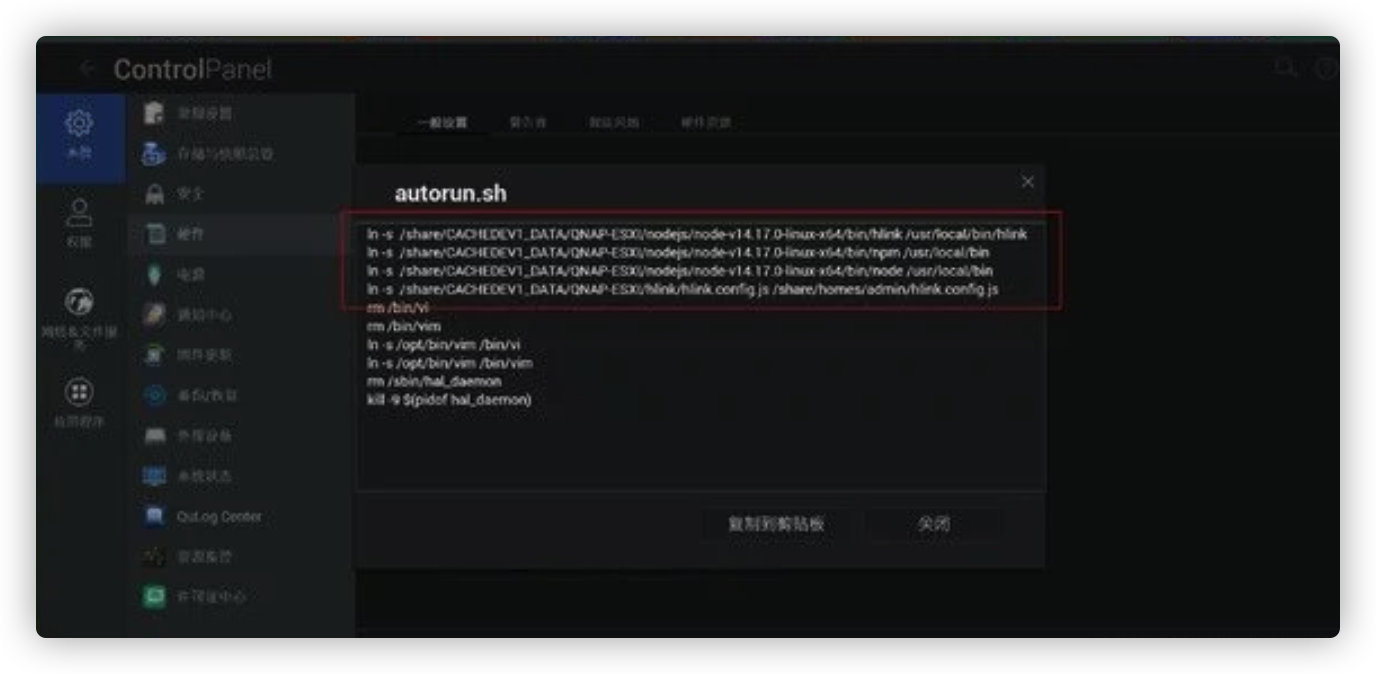
确认脚本正确以后,记得点击控制台的应用。
这样就完全配置好整个环境和运行计划。